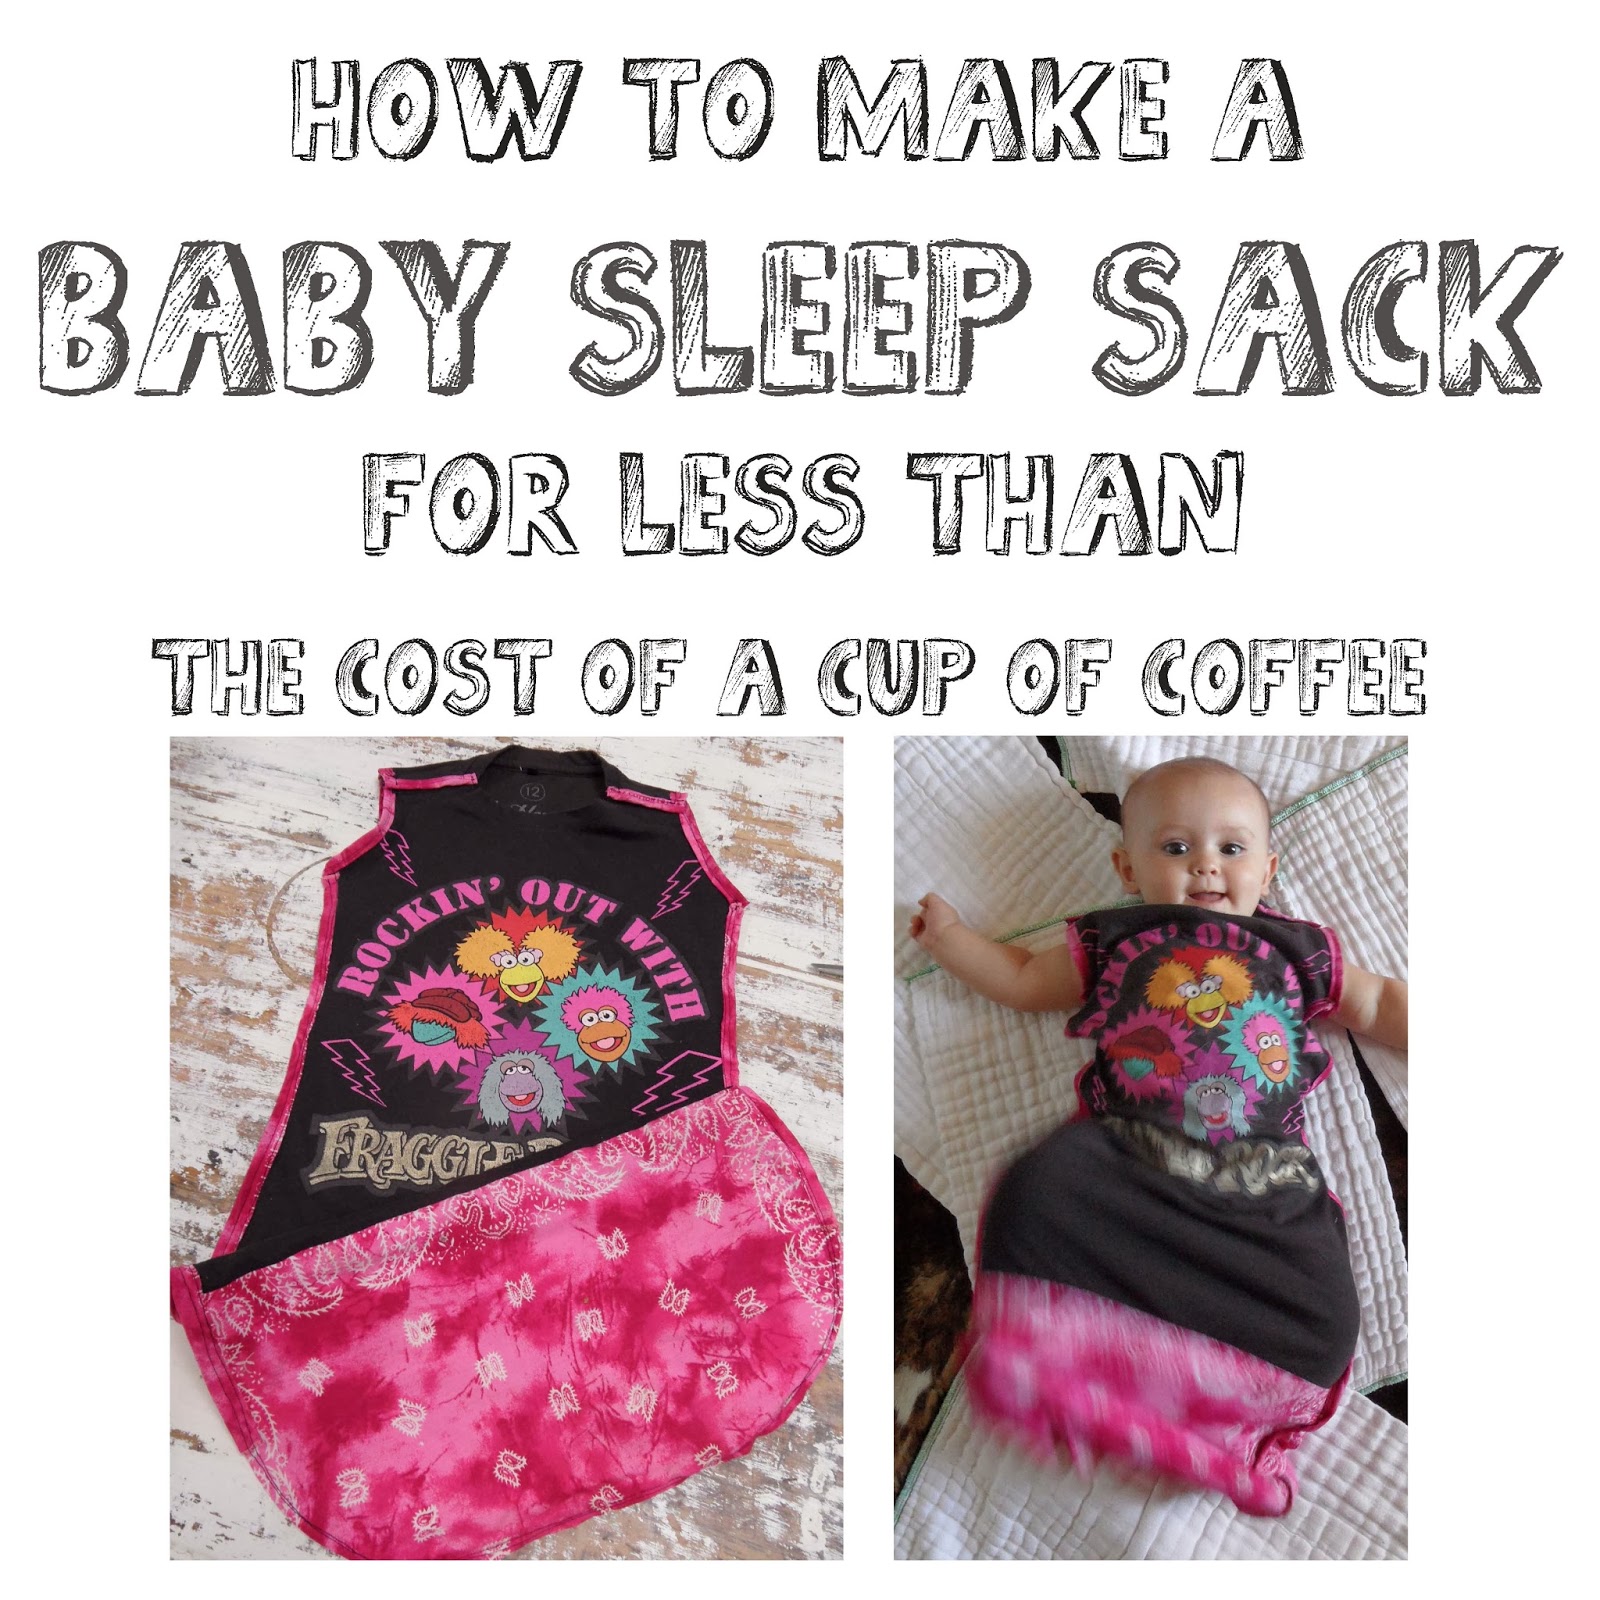
How to: Baby Sleep Sack (for next to nothing!)
Penelope loves her sleeping bags, or sacks or whatever you'd like to call them. I love them because it means that in the really hot weather she can wear just a nappy and her sleeping bag and I know in the middle of the night when it cools off a little, she won't get chilly but rather will still have that light layer on. It will also mean in the cold weather she'll have that extra layer on so that when she kicks off her blanket, she again won't wake up cold! But they are expensive! Ranging from between $30 at the cheapest end on sale, to well over $100 they make for an expensive blanket/bodysuit! And considering the Little Miss is somewhat of a chucker (read, spews milk on a more than frequent basis) they really can't be worn two nights in a row without a wash in between. I don't wash her clothes everyday so......
We had three sleep sacks and we were managing although I was saying I needed a couple more. Then we lost one. Don't ask. Something to do with a few drinks at a friends house, it being placed somewhere in or on the pram and subsequently falling out of the pram somewhere along the (short) walk home. So I figured, "it can't be too hard to make one?!" Hmmm......
So I set to work figuring it out and here's what I came up with:
I actually made one before this one, and while I was happy with it I did make a few mistakes that I managed to rectify with this one. And while it's a bit time consuming, it's reasonably simple to make. You don't even need a pattern! All you need is an old teeshirt and another piece of fabric - I used a square bandana. I made my own binding from the edges of the bandana but if you prefer you can either not bind it, or use ready made stuff. The cost factor came solely from the velcro used on the shoulders. Two pieces roughly an inch and a half long. Considering a packet of velcro cost me $7 and this is possibly a 10th of what was in the packet, I feel comfortable saying for less than $1 you can make this sleeping bag! So lets get to it!
You'll need:
1 old teeshirt, any adult size, any pattern you like.
1 bandana or similar square of fabric roughly 20 x 20" will suffice.
Binding of some sort if you are going to use it and aren't going to make your own. Roughly 60 - 80" all up.
Step One:


Step Two:
Decide how big you need it to be. Little Miss Penelope is 7 months old and smack bang on the 50th percentile for height and weight and this fits so perfectly - not tight, but not too loose. She has room to grow in it and room to wear some pj's underneath if it's cooler weather. So if you want to just use my measurements then go right ahead! I took the measurements from her current store bought sleep sacks and added just a little bit for growth.
**** If you work out your own measurements please remember that you need to make sure the sleeping bag can't ride up and over the wriggling munchkin's head while they sleep. Hence the importance of a well fitting neck and arms, but still allowing for movement and a little bit of growth as well. If in doubt, measure an existing piece of clothing that might be similar around the head and arms. ****
You'll be using the existing neck line of your tee so to find the right size here's what you do. Lay the front piece on top of the back piece, right sides out (just like if it was still sewn together), but put the front piece a couple of inches lower than the back like so. Then fold and pin the cut edges over themselves to make a neat seam on each of the shoulder pieces like so:
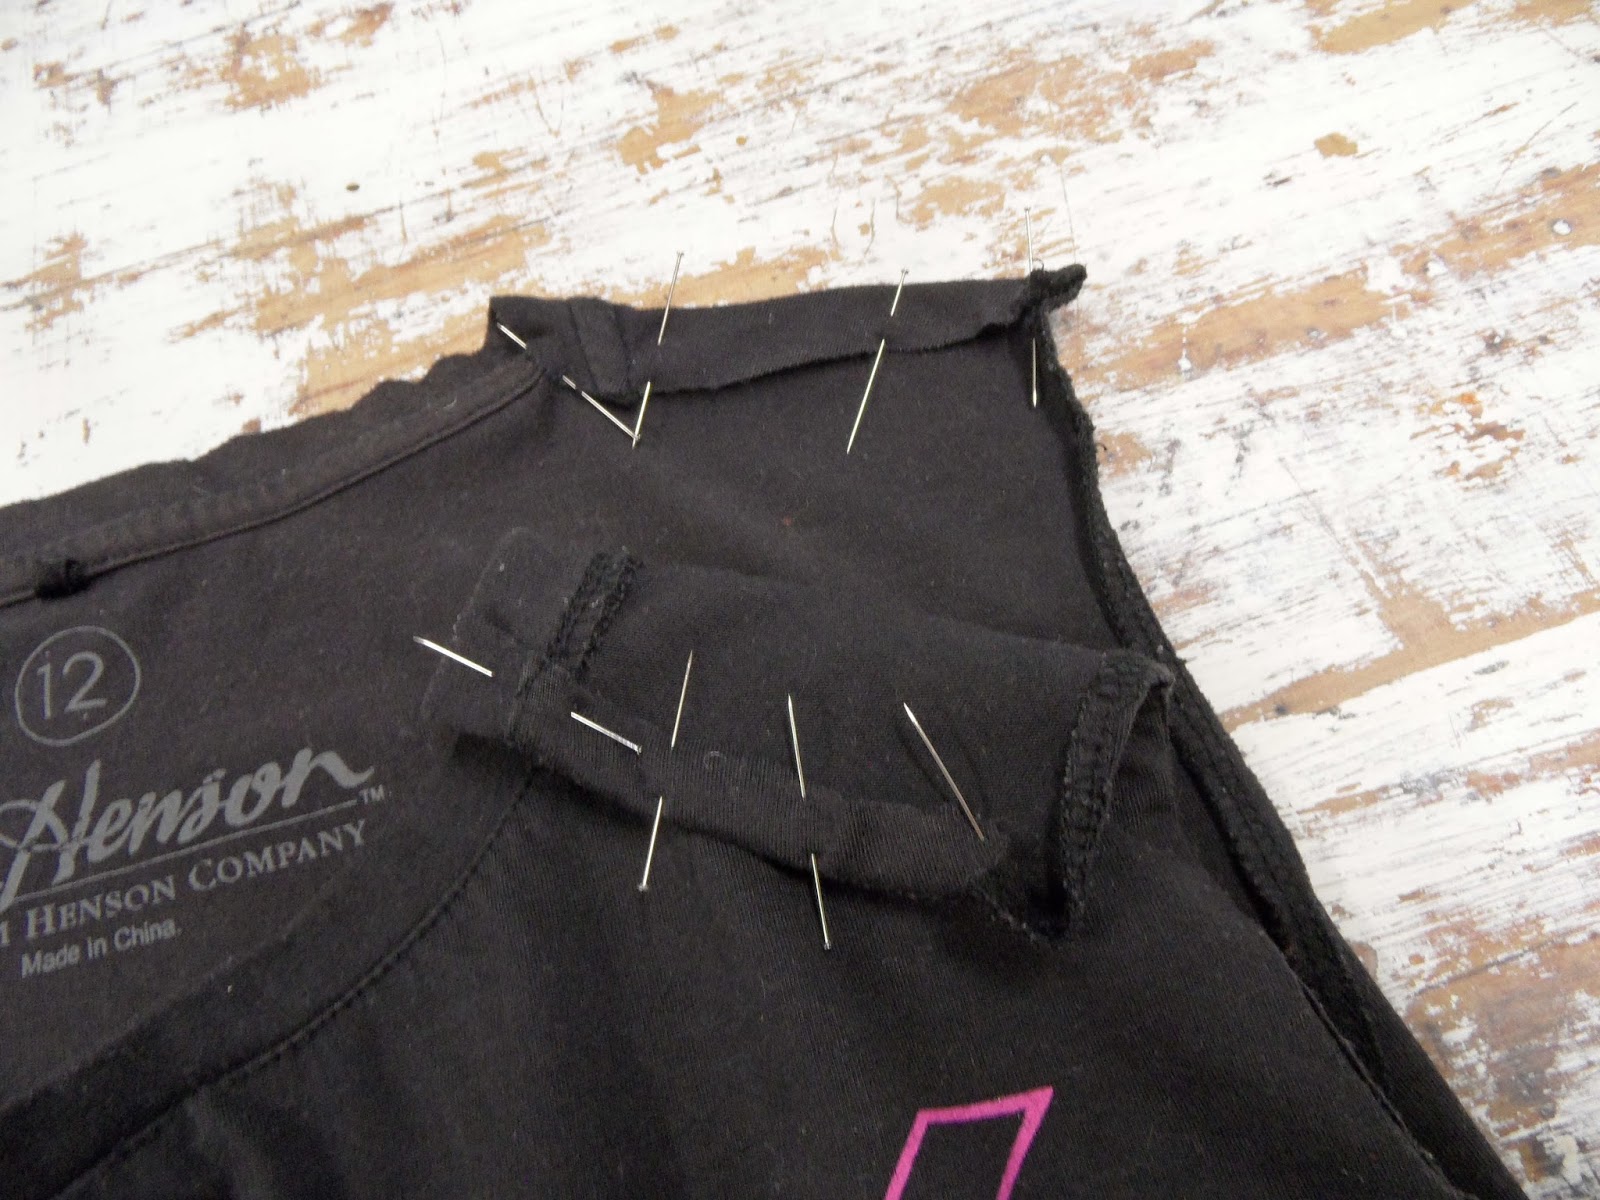
Then adjust the front and back while you fold the back piece over the top of the front shoulder piece. You need to adjust how far it overlaps until your neck opening measurement is roughly 4 inches from inside neck seam to inside neck seam. Your measurement for the opening top to bottom is 3 inches. Obviously if your baby is bigger or smaller you can adjust this measurement, just taking care to heed the caution above.
See the pictures below:


Step Three:
Pin this in place so that you can lay it all flat to cut out the body of the suit.

Lay your tee flat and at the bottom of it take your square piece of fabric, fold it in half and lay it at the end of the tee. Overlap it by your seam allowance amount, mine was about 1/2 inch. Make sure to have the fold of the fabric at the very bottom, as you can see in the picture above.
I used a big piece of paper and drew the sleeping bag shape basing it on the measurements I took and placed it over the top of the whole thing. Then I used a white pencil to trace around the outside, adding 1/2 inch on each side for seam allowance. Here are the measurements:

Front neck opening to bottom of sleep sack: 27 inches. From top back of sack to bottom is 30 inches.

From the top of the shoulder to the bottom of the arm is roughly 4 and a half inches. The outside edge of the armpit across is 13 inches. Using these two measurements you can make a slight half circle shape for the arms. (It will basically mimic the shape already created by the existing seam if you've used a women's tee.) The width of the shoulder flaps across the top is totally up to you - if you're not sure take a onesie or bodysuit and use the measurement from the neck to the shoulder seam, or just measure your baby's shoulders. Whichever works for you. Or you can just eyeball it like I did. That works too. :)

The narrowest point of the sack is 12 inches, and is roughly in the centre, about 9 inches or so down from the neck opening. See pics below:


Your bottom piece will be around 8 and a half inches from the fold to the tee seam (so unfolded it will be about 17 inches including seam allowances). The widest point of the sack is here where the fabric meets the tee. Mine here is 15 inches.


So now you have all your measurements you can go ahead and create your shape. Some sleep sacks have almost no shape to them, others are very curved, it's really totally up to you. Being able to customise it to what you want is one of the awesome things about making your own!
Cut out the shape you've chosen, creating just a slight curve at the bottom if you want. (You can leave it square if you want, there's no right or wrong. I just prefer it rounded.)
Step Four:
Make the binding for the shoulders, arms and outside edges. Like I said earlier, I made my own binding but this step is totally optional.
If you want to know how I did it, read on. Otherwise skip ahead to attaching the binding, Step Five below. ** I will point out here that if you don't want to use binding you don't have to. You can simply hem the rough edges and be done with it. If you are going that route, hem them, then skip ahead to Step Six. **

I cut roughly an inch off all four sides of my bandana before I folded it and made it into the bottom of the sleeping bag. As the edges were already overlocked, I only needed to fold over one edge of each piece and iron it down so it was nice and neat. (Those that know me will be perhaps a little shocked because my iron and I have a great relationship - I leave it alone and it leaves me alone. But for this, I needed to iron. It makes it so so much easier!)
I kept two pieces at the full length (roughly 19 or 20 inches), and the other two pieces were cut into three smaller pieces each. I didn't exactly measure the lengths, I just placed them over the arms and the shoulder flap and determined where to cut from there. Roughly (very roughly) it works out at two pieces around 8 inches each, and one at around 3 inches. So you end up with 8 pieces of 'binding' or 8 strips of fabric as you can see in the above picture.
Step Five:
Attach your binding. Start with the arm piece because then the shoulder binding will cover the rough edge of it. Then bind the top piece of the shoulder. That's the back piece, the one that will come forward and overlap the front to secure the suit closed. Just like in the picture below:

Once all six pieces of your arms and shoulder flaps are finished with binding, it's time to attach your sleeping bag together! You're almost finished, the rest is easy!
Step Six:
Place your front piece and your piece of fabric or bandana, right sides together at the bottom and sew them together, remembering that the fold is at the bottom. Do the same for the back piece and attach it to the other side of the fabric so you'll end up with something that looks a little like this:

Then place the whole thing right sides together. If you make sure the arms match up, the rest of it fall into place. Smooth over it to get rid of any wrinkles and then pin in place right around the edges. (Remember you aren't sewing the shoulders together, just the sides. The bottom is already together because it's a fold.) You should have something that looks like this:

Trim around the edge to get rid of any excess fabric, then turn it in the right way. It should look like this:

***If you aren't binding the sides, you're basically done. You can skip ahead to Step Eight, attaching the velcro. ***
Step Seven:
Still with me? Cool bananas, we're nearly done! Take your side bindings and attach them. I simply pinned them on, then sewed straight over the top like so:

Which then will look something like this when all sewn:

Step Eight:
Final step! Are you excited?! I was, but then I'm weird like that! So the final step is to attach your velcro to the shoulder flaps so you have some way to secure the sack closed on your little munchkin.
I'm a bit naughty and didn't take a photo so you'll have to bear with my written instructions, unless of course you already know how to sew velcro to fabric. Then you'll be done by now anyway and don't have to listen (read) while I ramble on some more.....
Okay, back to attaching velcro. I used the sew on velcro that you cut to size. I cut two pieces the same size as each shoulder flap (obviously that means I cut four pieces because velcro consists of a piece of hook and a piece of loop stuff....). A quick sew around all four sides on each of the shoulder flaps and then I trimmed all the excess bits of thread. (Read I was supposed to trim all the excess pieces of thread but got way too excited at how it looked and didn't.) But you should trim all the loose bits of thread so your baby doesn't eat them like Little Miss Penelope would if she could.
Then you are done like a dog's dinner! And it will look something like this:

Woop Woop!! Run around like a giddy school girl exclaiming how clever you are! Oh wait...that's just me. Oops! You can too if you like, but that step is totally optional!!
Here it is in action. Little Miss P is kind of hard to keep still these days, so they're action shots. Sorry! But you get the drift!


In case you're wondering, you simply slide it up over her butt to put it on. I like how it's soft, already worn in teeshirt fabric, but the bottom is cotton so it keeps her little toes cool. (She's a sweaty Betty, just like her Daddy!) You could also make this bottom section out of toastie warm fleece for a winter sleep sack to keep her toes toasty warm just the same.

 |
| Best Sellers List 2014; A Book You Must Read! |


WooHoo!! Very proud of you, well done and she looks totally happy with her new sleepwear.. :o) xxxx
ReplyDeleteShe was trying to grab the bottom of it this morning in bed. I think she likes the colour and patterns. And of course it's Fraggle Rock so it must be her favourite one! Just need to find a Punky Brewster one now......Her name in the show was actually Penelope you know!
Delete